Wednesday 25 February 2015

How to build your thread collection

Do you collect thread?

I certainly do. Have accumulated a lot of thread over the years until I decided to only use Aurifil thread for my FMQ. This thread is hard to come by over here and for this reason I have purchased 2 thread collection boxes, i.e. the Sheena Norquay collection and Mark Lipinski's Allrounder as well as individual spools that were needed at the time.

These thread collection boxes are good, however I wish I could build my own thread collection box. Having quilted for a while, I now know exactly what I would need and what is most useful.

Here it is...Karin's thread collection (with a few added individual tones)

I would need a threadbox that incorporates both Aurifil Mako 50/2 and 40/3 as I sometimes want to emphasize certain areas of quilting. In terms of purchasing the boxes you however need to take one or the other which I have found a bit limiting, so giving my avid FMQ I have purchased the 50/2 thread.

The colours you see above are the ones that I most frequently use:
gold type colour: goes with lots of quilts if you like me do lots of country type coloured quilts. Also is a nice accent colour if you like hyperquilting in feathers.
light green: am on my third spool with that...use this all the time and this is the one where I realized that I need the 40/3 thread (with the green cap) as well.
surprising pink: I am not a pink person at all but this pink has been most useful in quilting anything with a dark red fabric (as I often do).
blue tones: my new favourite
varigated: one spool of variegated thread for allover designs. The one I have there probably has too much green so I would look probably for a slightly toned down version

So, here is my box:
White 50/2: for baby quilts
Off white 50/2: for all other quilts
Taupe/Sandy thread 50/2: when you really want to blend in your thread for a multi-coloured quilt.

Gold 50/2 and 40/3
Light-green 50/2 and 40/3
Dark Pink 50/2 and 40/3
Blueish tones 50/2 and 40/3
Variegated thread 40/3

Exactly 12 spools...I am on a winner here. Once your box is done, then you can add to it as I certainly have done with different individual spools of different tones (see above the red-brownish tone added to the gold) for individual projects.

On the Aurifil's website they are talking about Customized collections coming soon...not sure whether this applies to individual customers...maybe that would be too labour intensive. Would be good though.

Anyway, back to some quilting...

Karin

Sunday 22 February 2015

Another Basket

Finished off another basket, this time using the orange fabric as an accent strip.


Karin

Wednesday 18 February 2015

February 2015 FMQ Challenge


Finished my pillow!
As for January, the FMQ challenge over at QuiltShopgal had 3 options to choose from. This months' expert is Leah Day whom I cannot praise enough for getting FMQ out there with her blog The Freemotion Quilting Project. When Leah ran her 2012 FMQ Quilt Along, I participated for the year and I must say that I learnt more than I ever did in any workshop that I attended. She is a very talented woman (obviously) and also a very good teacher.

For this challenge I chose Option 3 as I had purchased Leah's Craftsy class 'Freemotion Quilting a Sampler' some time following 2012. If you have not tried the Craftsy class experience I can highly recommend it...I did not do the sampler (Free BOM class on Craftsy) but I do tend to go back to this class quite often to just refresh my memory on a particular design and to learn new ones. The great thing is that you can go back to it over and over again...it's really like having an interactive reference book that you can consult any time. Great resource.

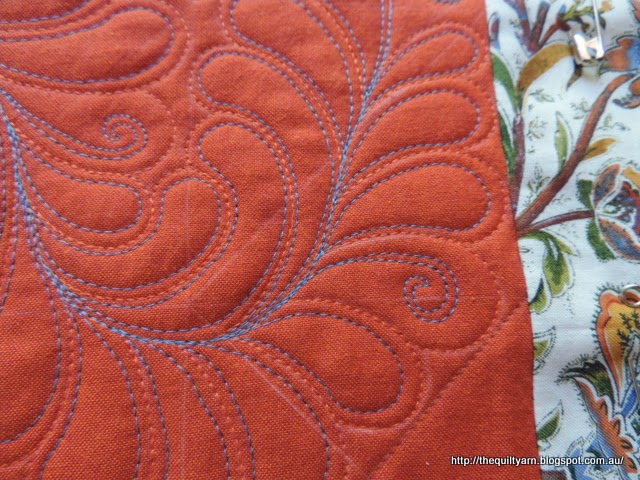
Was a bit stumped for ideas and felt too lazy to piece a block so had a look at block #11 of that Craftsy class as Darlene had suggested and decided to stitch that one out...actually my whole purpose for this pillow was to use a very exuberant orange Aurifil thread (#1154) and mix it with the most fantastic blue-grey Aurifil thread (#1126) that came as part of Sheena Norquay's thread collection. This was the perfect opportunity.

First did a sketch as always...if I cannot draw the plumes properly in one area I also will not be able to stitch them properly, so I make sure it flows for me. I did mark my fabric but will often deviate from the lines, however the marking helps me not to loose direction. This was a bit tricky in parts with the curvatures and some plumes were in danger of being too long and drawn out and that became evident when I was drawing it. Leah had alerted to this in her Craftsy class which was great as I would have run into trouble if I had just stitched this out completely freehand.
Progress was a bit slow...I took my time, enjoying stitching with this beautiful thread even though the orange did not come out quite as bright as I had hoped. Also, while I followed Leah's example, I mixed in a bit of Patsy Thompson's hyperquilting (yep, a bit addicted to that ever since I watched her DVDs) and Angela Walter's nifty wiggly line filler. Thoroughly enjoyable. Noticed that I was quite out of practice stitching straight lines....Then onto the Paisley...had not done this for years. Never have been very good at Paisley for some reason as I tend to get confused on which side of the shape I will end up on and generally have some gaps. In Leah's Craftsy class she was suggesting to just fill this in with some Pebbles...ingenious...why did I not think of that before! So, at some stage I started to just do Pebbles and had to remind myself to not opt out and continue with the Paisley.

Then came the pillow...had watched Leah's Butterfly pillow video and got a bit enthused about doing the buttons on the back. For the life of me could not work out the required measurements for my pillow size (16in) and searched and finally found a tutorial which really spelt it out for me over at Sew Sweetness. While that pillow did not have the accent fabric strip on the back, it helped me with the measurements and it also had a binding around the pillow which I liked. In the end I literally combined the two instructions and muddled my way through it. My Pfaff has an automatic button hole function which was great to use (after consulting the manual!)...worked like a dream. Given the floral design on the pillow I did not try Leah's spiral design but just meandered over it to as I felt that suited the overall look a bit better.
Work in Progress
Wiggly Lines

Paisley with lots of Pebbles
The finished pillow
16in finished pillow with accent binding
Back of pillow

For all the Pfaff followers, here are the settings that I used with Aurifil Mako 50/2 thread.
Feather: New Open-Toe Freemotion Spring foot on the spring foot freemotion mode with tension 3.8 on a slow setting.
Wiggly Lines and Paisley: Dynamic Spring foot 6D on the Dynamic springfoot freemotion mode using the modified Pfaff ankle for better visibility, again with a tension of 3.8 on a medium speed.
Meander: Closed Sensormatic foot in the sensormatic freemotion mode on a higher speed, with a slightly lower tension of 3.6.

Now it's time to link up and check out some FMQ Goodness over at QuiltShopgal.


Karin

Wednesday 11 February 2015

Busy with WIPs

Have been busy with several WIPs.

1. February FMQ Challenge over at the QuiltShopGal
Realized that this is a somewhat shorter month and we are almost half way through, so started my pillow this weekend. This months' expert is Leah Day and as for January there are three options to participate. I dragged my feet for a while not being able to make up my mind what to do... actually my choice is influenced by the thread I wanted to use...had to be the beautiful orange Aurifil thread that I have, mixed with that blue...

Here is a sneak preview of some FMQ Goodness: Did not quite turn out as bright as I had imagined but it still will be nice
Watched Leah Day's video about her Butterfly pillow and got quite inspired to try to do a button closure on the back...need to do a bit more research on this though to figure out how that is done.

2. Finished all the blocks of the Field Study quilt: Thank God for that, this was dragging me down. Left this for a minute to be sewn together another day.

3. Found some backing for my Stretched Star quilt
Bought this bright yellow fabric as a backing for my hexagon quilt that featured a lot of yellow. Was so confident when I went to the shop I did not even take a sample...only to find it did not match my hexagon yellow at all. Completely different shade and I had bought some meters of this.
What a strike of good luck, as it fits the yellow in this quilt perfectly and goes with the overall bright and happy theme. Sewn this together and this quilt is now ready to be basted and more importantly to be quilted. Still not sure whether to do an overall FMQ design or go around the stars outlining them...leaning towards an overall design at the moment.
I want to get this done and write up the pattern.

4. Doing another basket in brown tones...

Yep, busy...why do we always do that, starting several things at once with another two to five ideas lurking around in the background. Almost stressful!

Until next time

Karin

Wednesday 4 February 2015

Just For Fun- GO! Strippy Catch-All Basket

I only have two blocks left on my WIP A Field Guide, hence I thought it was time to do something more fun, given that I am still not convinced about the colours of the quilt. Not excited about it at all but forcing myself to complete it.

So, a bit of fun was on the agenda...I saw these cute fabric baskets over at Freemotion by the River. Connie had found a free pattern for the GO! Strippy Catch-All Basket on the Accuquilt website

http://lghttp.10957.nexcesscdn.net/804DA9/Accuquilt.com/media/catalog/product/cache/1/image/370x/9df78eab33525d08d6e5fb8d27136e95/p/q/pq10430_l.jpg

Really liked this and when I saw  Connie's Batik ones, I just knew I had to make one.

A friend of mine gave me some batik strips when she returned from a trip from Bali last year. Just beautiful

I picked the orange-red strips, following the pattern a bit by inserting a contrasting cream strip

The construction is very easy. You don't need a GO! Cutter and there is really no requirement to follow the pattern in terms of the arrangement of the strips. I just liked the look of it. 
5 1/2in x5 1/2in x 4 1/2in
Got myself some fusible fleece today and just whipped it up. Very fast to do. One of those instant gratification projects. Came out alright although I had to laugh...after so many years of quilting I spent most of the time on trying to get an exact 15in x 15in square. Struggle with squaring up every single time! The only other issue I had was that I did not leave enough gap to pull it through, which resulted in a bigger opening which was not secured properly leaving that side of the edge a bit untidy when I slip stitched it closed. But apart from that, turned out really quite nice.


Planning on making a few more of those. The pattern gives 6 different sizes.

Linking up to Linky Tuesday at Freemotion by the River. Connie, if you see this...thanks for sharing that link the other week, this was good fun to make.

Also linking up to Friday's CreativeGoodness Linky Party over at QuiltshopGal.

Karin

Monday 2 February 2015

WIP: A Field Guide

I wish this was finished. Two more rows to go. This really is in danger of becoming an UFO...still am not thrilled with it. That's why I need to keep at it...


This looked quite alright when I had designed this in EQ7

The block comes out at 10.5in and looking back at the program it appears that I have drawn it...must have seen it somewhere.


Well, win some, lose some. Who knows, might turn into a beauty once I FMQ it.

Karin

Popular Posts